
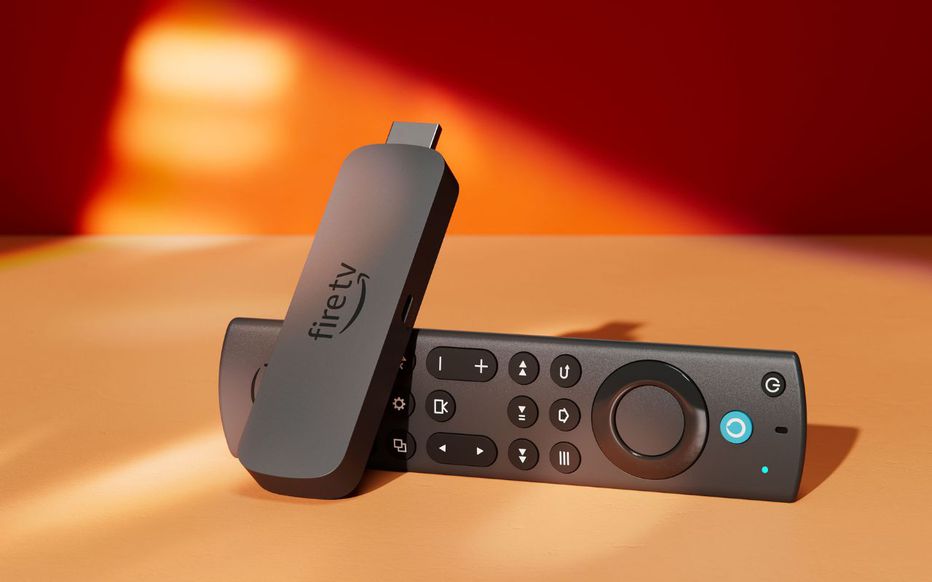
Firestick is one of the most popular streaming devices for IPTV users.
Getting IPTV to work on your Firestick is a simple task that will take less than 10 minutes to finish all you have to do is install an IPTV player of your choice on your device with the help of the setup guides we have on our website.
You will find the setup guides either on the left sidebar if you’re visiting from your laptop or below under “SELECT A PLAYER” if you’re on your phone click on the IPTV player name to go to the setup tutorial.
What Are the Requirements
1- IPTV Subscription: if you don’t already have a subscription I will suggest you read this guide on How to Choose the best IPTV provider for your needs.
2- VPN Subscription: although in many cases the VPN is not a requirement but it’s still highly recommended to have a subscription with a VPN service that will ensure you’re streaming privately and bypass your ISP restriction you can check this guide on What are the Best VPN services for streaming IPTV.
Best Practices/my recommendations
the setup articles will take care of sharing all the necessary information that you need to help you stream IPTV today but if you’re new to IPTV you need to keep in mind that selecting the right IPTV player is what defines your experience.
There are many IPTV players out there we try to cover all of them on this blog but the moment two of them really stand out, Tivimate and IPTV Smarters Pro, Tivimate is considered to be the best IPTV player currently available because of its many great features that will enhance your streaming experience.
Tivimate is a premium app 4.99$/year for 5 devices while IPTV Smarters Pro is a free app, if this your first time and you just want to discover how IPTV works I will suggest you to go with IPTV smarters pro since it has a simple user interface and of course you have the option to change the IPTV player any time you like.
How to Setup Tivimate on a Firestick, Fire TV, and Fire Cube
with its easy-to-use interface, fully-fledged features, and solid integration to IPTV services, Tivimate is without any doubt one of the best IPTV players you can find out there.
In this article, I will break down how to easily set up Tivimate on your Firestick, Fire TV, and Android TV Box plus I will share a full review of all the features it provides.
what you first need to know is that Tivimate comes with two versions free and premium, I highly recommend you to go with the premium version which offers the following:
Catch-up
Allow connecting to multiple IPTV providers ( multi-playlists )
Schedule recordings
Add your favorite channels to a custom playlist
auto-update for the TV Guide ( EPG )
and many more
In my opinion, without the premium upgrade, it will be better to go with free IPTV players such as IPTV smarters pro, where you can get many of these premium features free of charge, but if you’re looking for a complete enjoyable user experience, you might want to give Tivimate premium a chance especially it’s not that expensive only 4.99$/year for 5 devices, and it comes with a 5-days free trial.
before diving any further with the features and how to make the most of them, I will first explain to you how you can easily set it up on your device step by step ( with screenshots )
How to install Tivimate on FireStick, Fire TV, and Android TV Box
If you have a google tv, NVidia shield, or any device that has direct access to the play store, you can simply go to the app store to download this app.
Just like any normal android application, type its name on the search bar click on the app icon, and hit install. you may find another app with a similar name called Tivimate companion, it’s just the app that allows you to create a premium account which I have covered below.
but if you have a Firestick there will be some additional steps you have to go through to sideload this app, because it’s not available by default on Fire TV Apps. ( don’t worry it will take you less than 15 min to get it on your Firestick)
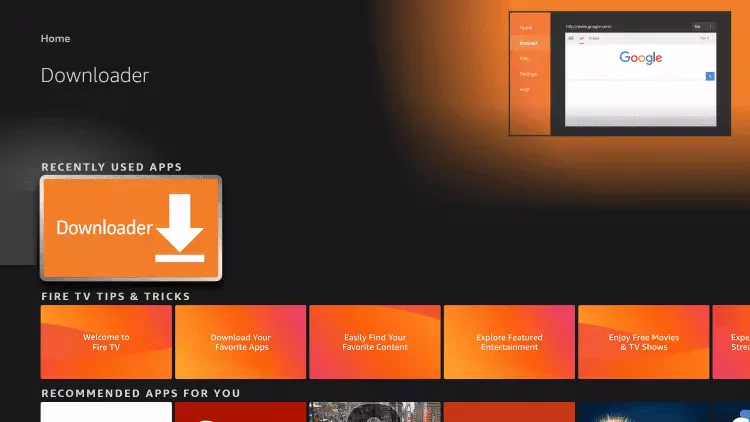
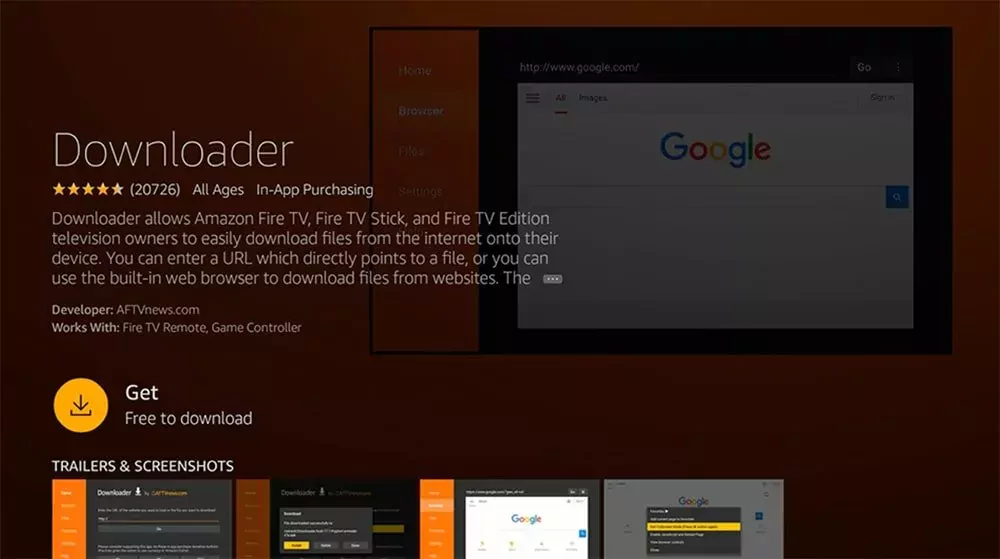
1 Install Downloader app
there is an app called the Downloader which I have covered how you can install it on your device in a separate article, if you haven’t done this yet, make sure first to read this article:
2 Open Downloader on your FireTV.
after installing it on your device click on the app icon and launch it.
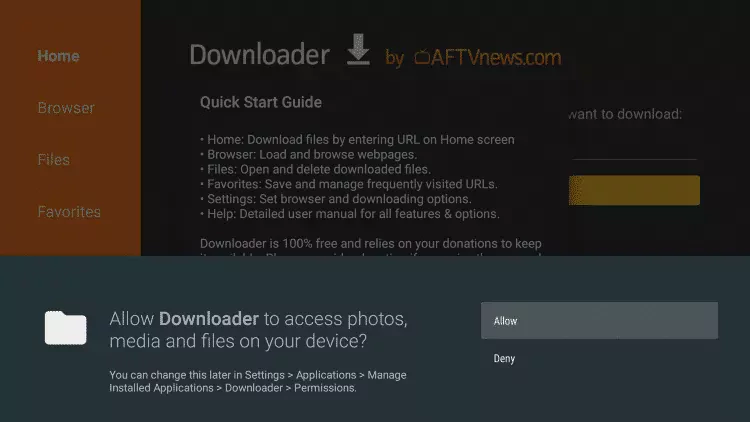
# 3 permit it to install applications on your device
Click on allow button as shown on the screenshot below.
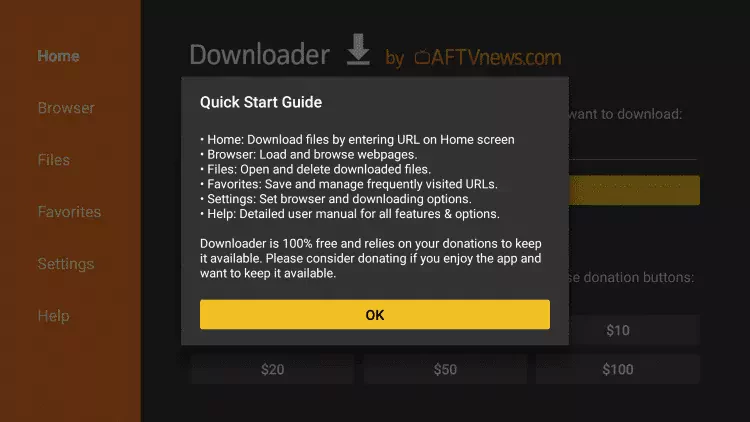
#4 skip the quick start guide
just click on the yellow button ( OK )
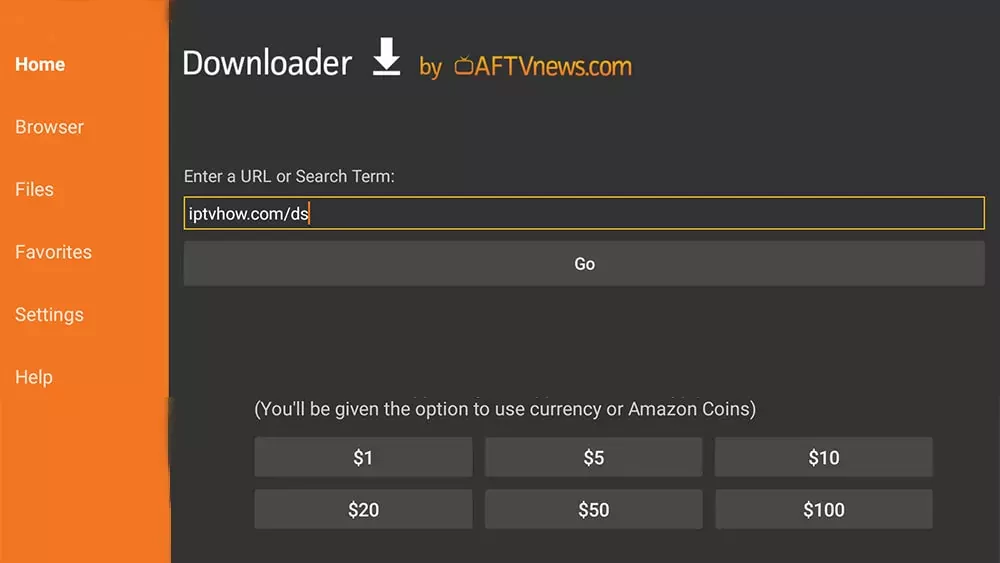
you will see a URL box, place your cursor in it and press ok on your remote to open the keyboard. type this URL exactly as shown here: https://iptvhow.com/tiv or this Number: 24637
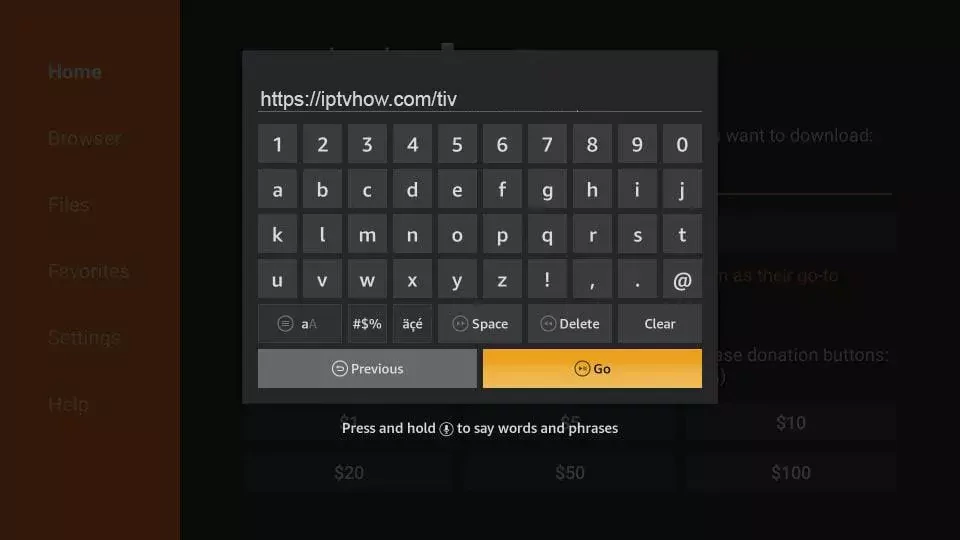
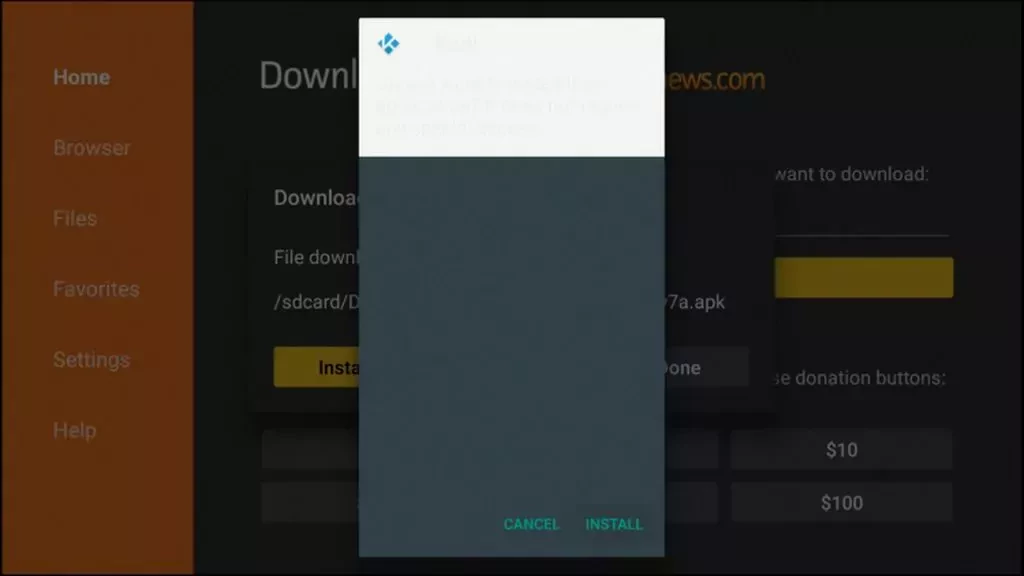
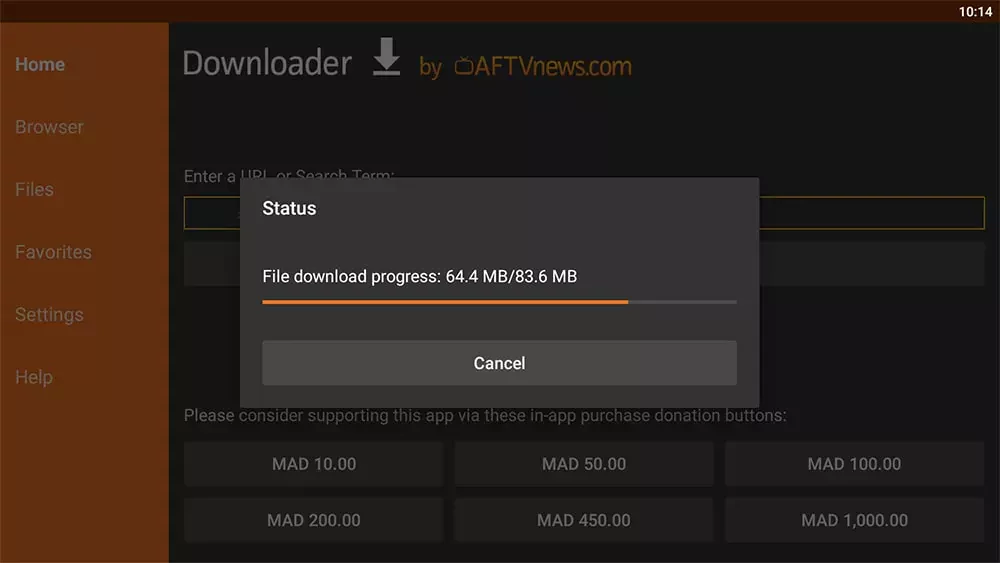
# 5 click go to start downloading the app then click install.
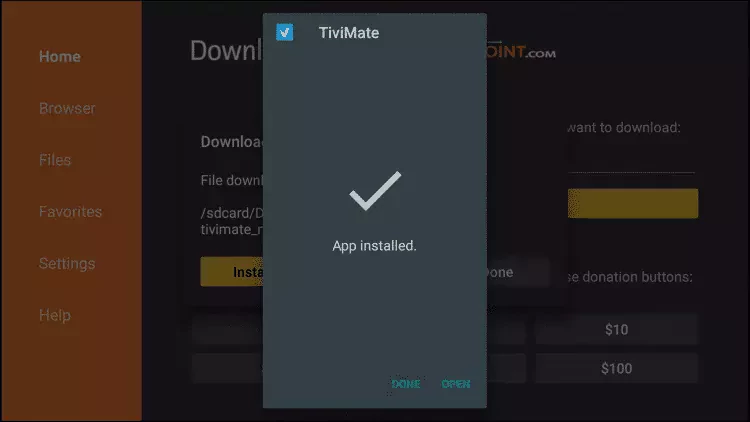
6- Click Done
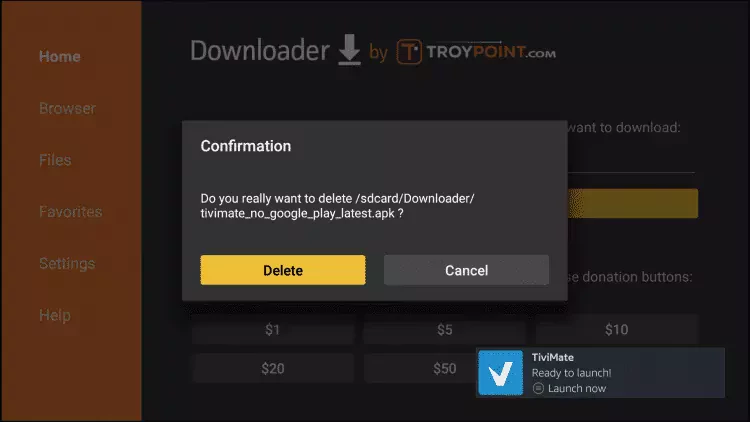
#7 you will see another pop-up click delete
since you have now successfully installed the app there is no need to keep the file you downloaded earlier.
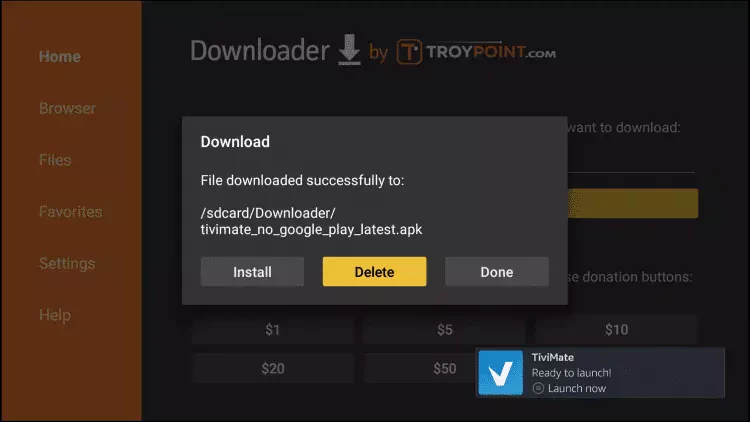
#8 Confirm the Deletion
Click on delete again to confirm that you want to remove this file.
#9 return to the home screen on your device then click see all.
#10 scroll down until you find Tivimate
hover over it and click the menu button on your remote control it looks like 3 horizontal lines, then click on move to the front to make it easier for you to access this app every time you launch your device.
Note: The app has an auto-update feature so you will no longer need to sideload it. The app checks if a new version is available once per day. Also, you can manually check for new versions in Settings -> About.
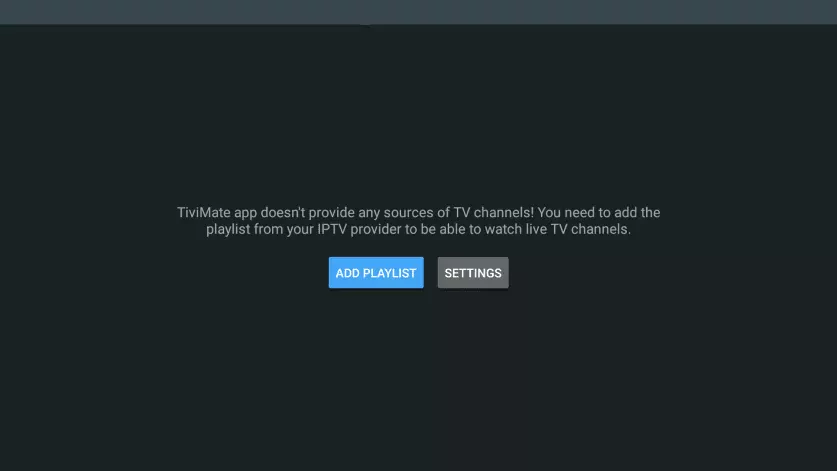
How to connect Tivimate to your IPTV provider
The main thing you need to know is that Tivimate is not a provider, it doesn’t give you any access to Live Tv or VOD ( Video-on-demand like movies & series), you need first to purchase a subscription from an IPTV provider based on your needs.
providers come in all shapes and sizes. do your research first check some reviews and always test only with one month when you first sign up to make sure the stream is stable.
I have published some articles reviewing how to choose the best IPTV provider along with some recommendations of what I personally use.
when you sign up for a subscription they will send you an email with the m3u link that looks like this: http://line.domain.com/get.php?username**xxxx**&password=**xxxx**&type=m3u_plus&output=ts
Follow the screenshots below to make sure you successfully connect Tivimate to your IPTV provider server.
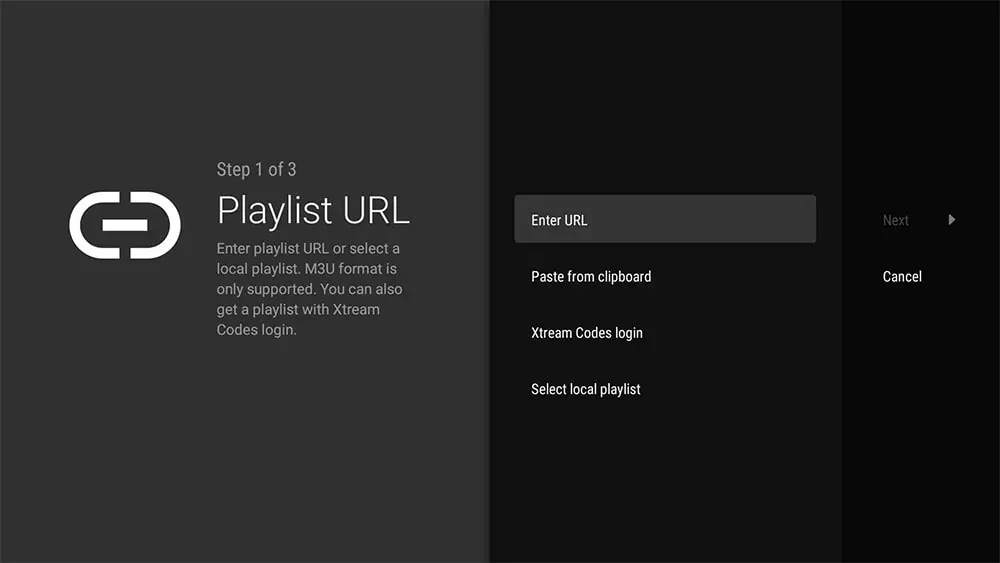
1- open Tivimate and click on add a new playlist
2- click on Enter URL
you will see many options you can either choose to connect with the m3u ( Enter URL) or Xtream codes login, for simplicity choose m3u ( there is no difference between the two) and you will get the same result at the end.
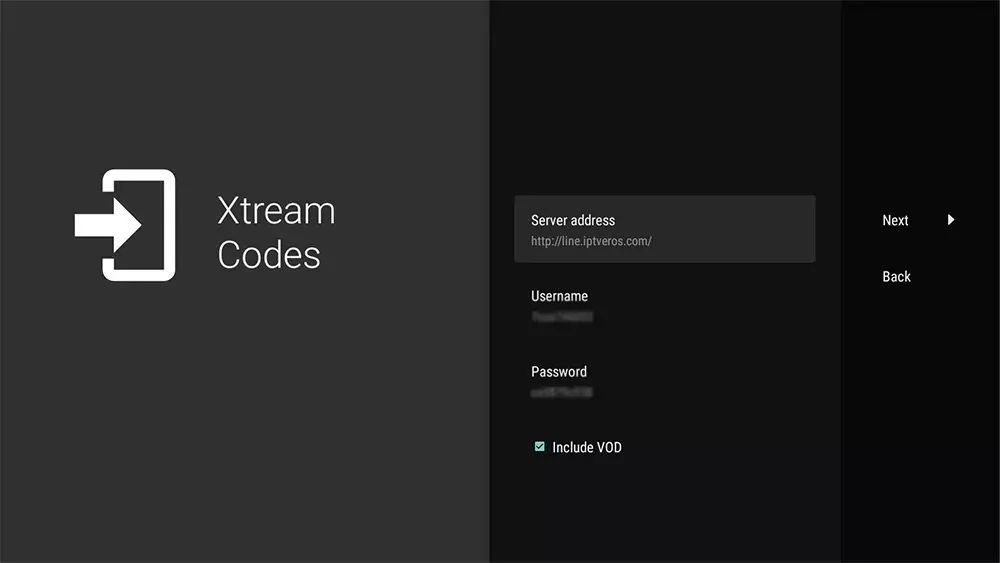
3- Type your Account information. & click next
as I said before your IPTV provider will send you some information including an m3u link that looks like this http://line.domain.com/get.php?username=XXXX&password=XXXX&type=m3u_plus&output=ts
Depending on whether they send you the Xtream codes login or not, you can always extract it from the m3u URL.
- URL: is this first part: http://line.domain.com/
- Username: is what after username= XXXX
- Password: is what after password= XXXX
4- wait until the processing is completed
Tivimate will start connecting to the server which can take about 1-3 minutes based on your internet speed.
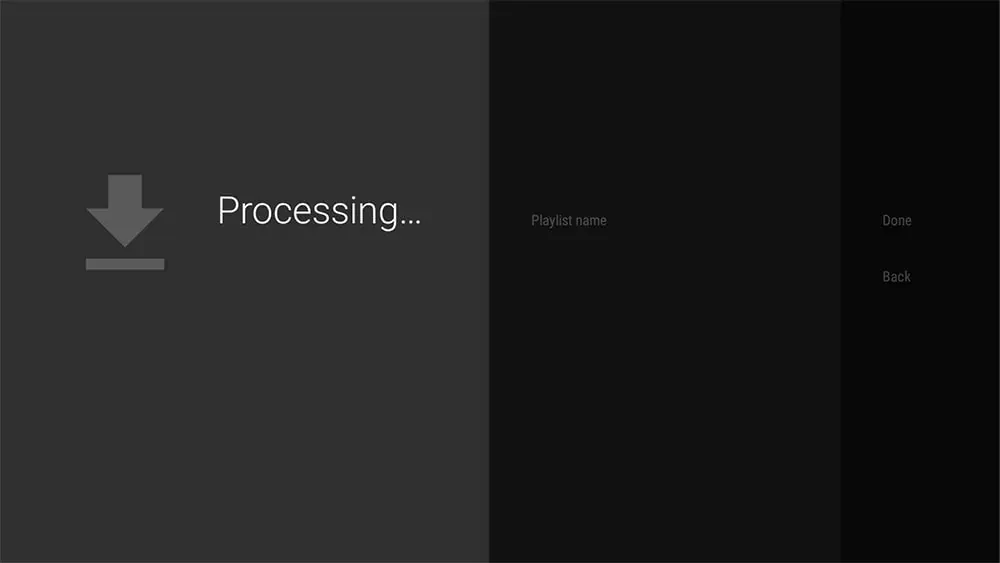
5- Click Done.
as shown on this screenshot after the processing is completed Tivimate will display the total number of channels your providers have given you access to.

6- Installation is completed
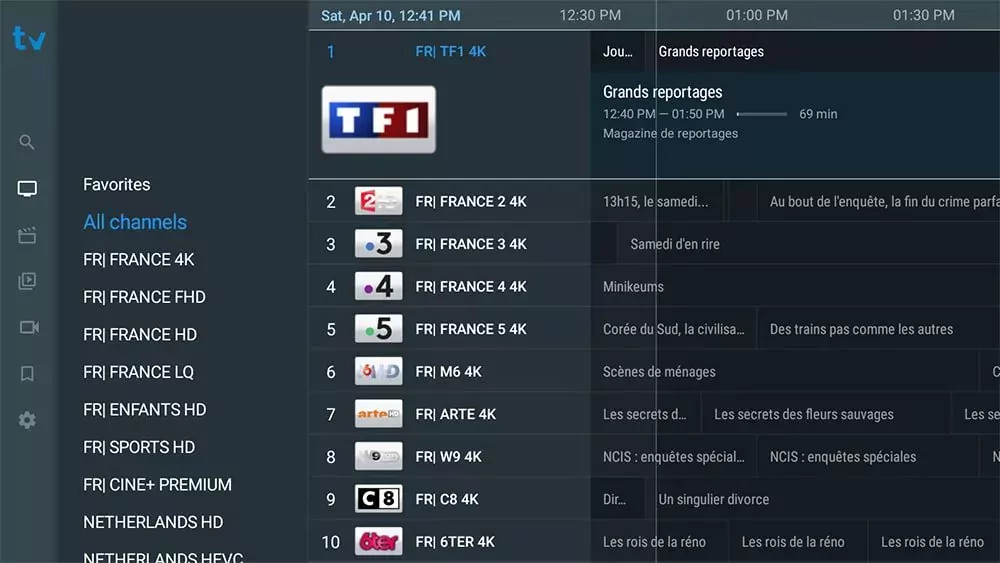
Congratulations you can now stream and customize the channels list, if you want to know how you can make the most out of Tivimate read this full features reviews.
> How to make the most out of Tivimate. full features review
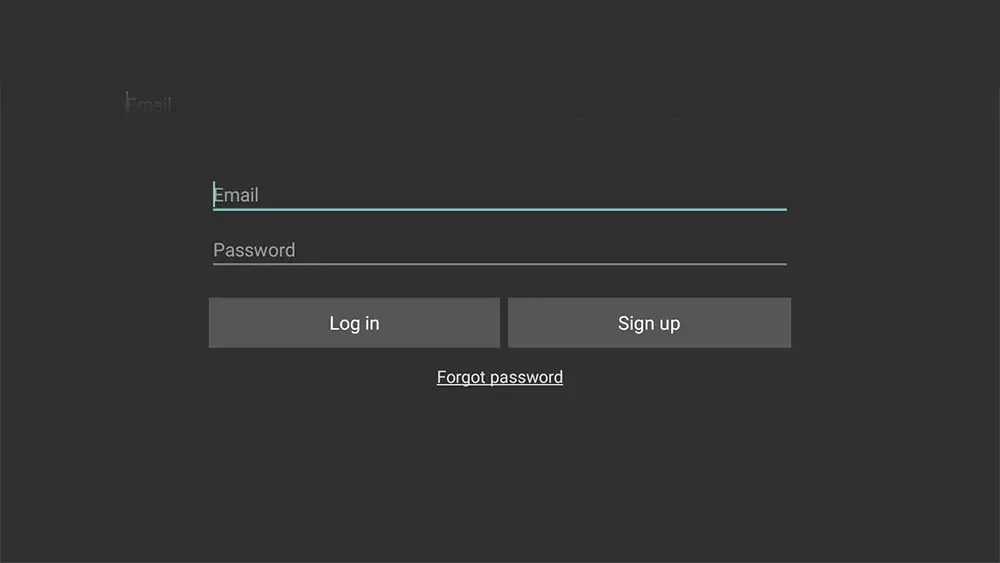
HOW TO CREATE A PREMIUM ACCOUNT WITH TIVIMATE
Now you have successfully finished connecting your IPTV provider to Tivimate, you will start to notice that many of the features are not working.
and this because you still have to unlock the premium features by entering your account details.
if you’re interested in the premium version you should register an account on another app called Tivimate companion.
Now what you need to know is that this app is only available on the play store if you don’t have an android phone, you will need to install an android emulator on your computer, I prefer Bluestacks which is available for both Mac OS and windows.
like any other program, all you have to do is to visit their official website ( https://www.bluestacks.com ) and click on the download button, after finishing the installation process you can log in to your google play account and search for the app with the name of ” Tivimate companion”.
if you don’t have an android phone or a computer to run an android emulator, there is no site or other way to register an account ( at least by the time this article got published I will make sure to update it if this changed in the future), the best option is to ask a friend or a family member to register an account for you.
creating an account is very simple just type your email account and a password ( make sure to save them both on a password manager or a safe place because you will need to use them later).
after completing the payment, close this app and go to the device you have already installed Tivimate on.
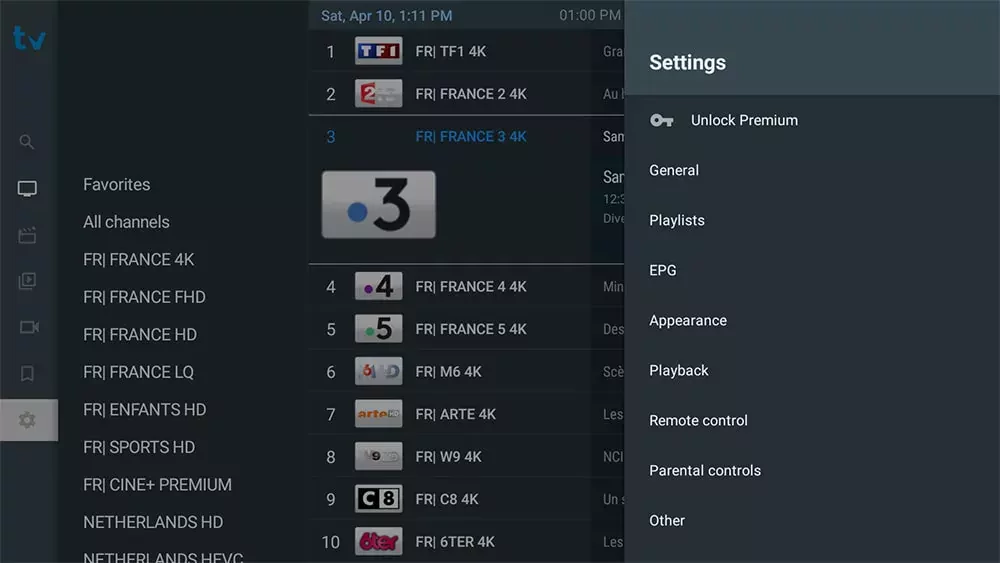
Open the Tivimate app and go to the settings you will see an option called unlock premium click on it.
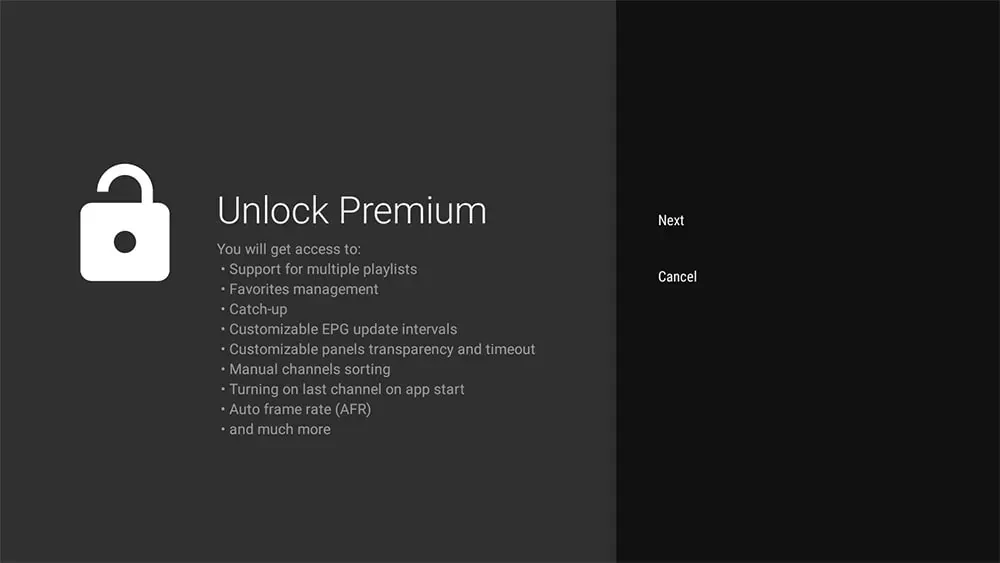
2- Click Next
this is just an Overview of what are the main features of Tivimate app.
3- Click on account
here you can use the same email and password you registered with on Tivimate companion on the next window you will be able to give your device a name and then access all the premium features right away.
How To Set up IPTV Smarters Pro on Firestick, Firecube, and Fire TV
IPTV smarters pro covers all of your IPTV streaming needs in a slick and easy to use interface, unlike other premium IPTV players like Tivimate which you will find only available on a firestick or android TVs, IPTV smarter pro is available on almost every operating system this includes LG WebOS, Samsung Tizen OS, android phones, Windows and MAC OS
don’t get miss led by the pro word, IPTV smaters player is 100% free to use and there are no limitations on how many devices you can use it on also there is no account creation process that you’re required to follow in order to unlock some features.
you can access all of the features out of the box from the moment you download it and connect to your IPTV provider.
when it comes to Firestick, options to download IPTV players are limited since the Amazon app store has rejected almost all IPTV players including IPTV Smarters Pro in this article I will break down how you can easily sideload this IPTV player to enjoy an enhanced and free to use streaming experience.
Note: IPTV Smarters like the majority of IPTV players doesn’t provide you with the content ( Live TV & VOD ) you will have to purchase a subscription from an IPTV provider based on your needs
you can check this guide to better understand how you can choose the best IPTV provider for your needs.
How to install IPTV Smarters Pro on a firestick step-by-step guide with screenshots.
PART 1: INSTALL THE DOWNLOADER APP AND GET A VPN
Now what you need to know is that there are many ways you can sideload apps on Amazon firestick, Fire TV & fire Cube, using the Downloader app is the simplest way to do it.
before following any further with this guide make sure to first download the downloader app which I have covered how to do in this article.
How to install the downloader app on a Firestick
Now you’ve finished installing the downloader app and allowing apps from unknown sources, activate your VPN because Amazon prohibited downloading apps from unverified developers.
if you don’t already have a VPN service I will advise you to get one before even considering watching IPTV for many reasons which you will find all on this article alongside some recommendations for VPN services that I currently use.
Why you need to use a VPN when streaming IPTV, protect yourself today
PART TWO DOWNLOAD IPTV SMARTERS PRO ON YOUR DEVICE USING THE DOWNLOADER APP
1- Open the downloader app
Just like any other app, you will find the downloder app listed with the rest on your installed apps click on open to access the settings.
2- Write this number/URL
the downloader app gives you the option to install apps using various methods, the easiest way is writing numbers which are basically a URL shortener to the full URL, you can either write this URL iptvhow.com/ds or this number: 73224
3- Wait for the download to finish
the downloader app will automatically start downloading the file
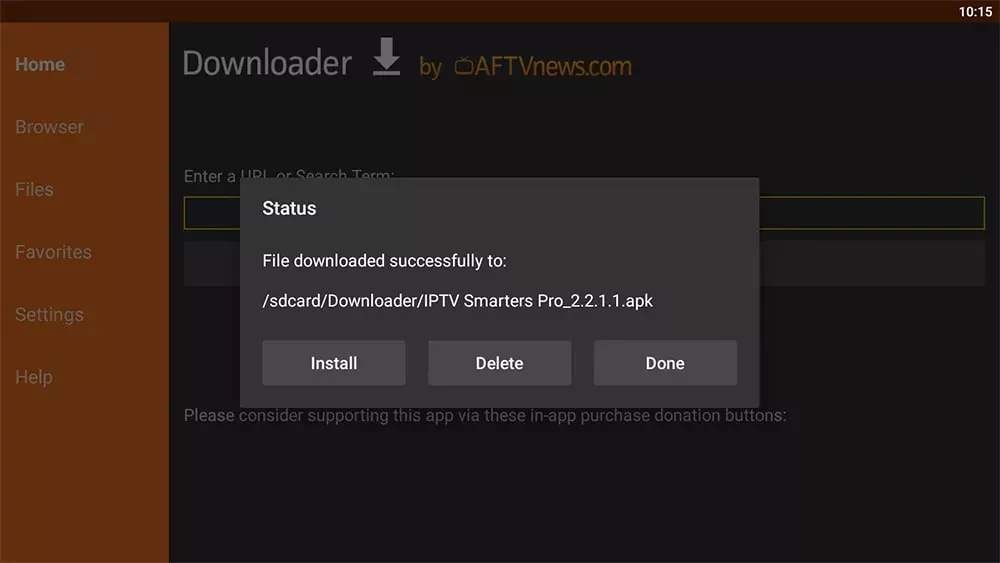
4- Click install
after the download is completed the downloader app will automatically run the app and display the instalation guide click on install.

5- click close
now IPTV Smarters Pro has succulently been downloaded on your device, click close to delete the recently downloaded file because there is no further use for it.
6- Delete the APK file ( optional )
since the app is already installed the APK package is no longer required you can delete it from within the Downloader app to save space on your device.
Part Three: connect to your IPTV provider
when you purchase an IPTV subscription your provider will send you some information usually it includes an m3u link that looks like this ( http://line.domain.com/?php….) and the Xtream codes API which comes with 3 main components a Username, a password, and the server URL.
the best part about IPTV Smarters Pro is that it allows you to use any method you like, I will definitely recommend you to go with the Xtream Codes API since it’s much faster in my opinion than the m3u, you might ask what is the difference between the m3u and Xtream codes API.
To understand the difference between the two, with the m3u each time your player needs to refresh the channels list it will have to download the whole m3u file which can get large if your provider gives you access to 10000+ channels.
Xtream Codes API is a better option because it can update the playlist faster since it doesn’t need to download the whole file, also it comes with better EPG support, but genuinely as long as you have a good internet speed it will not make that much difference especially if your IPTV providers server was stable and fast.
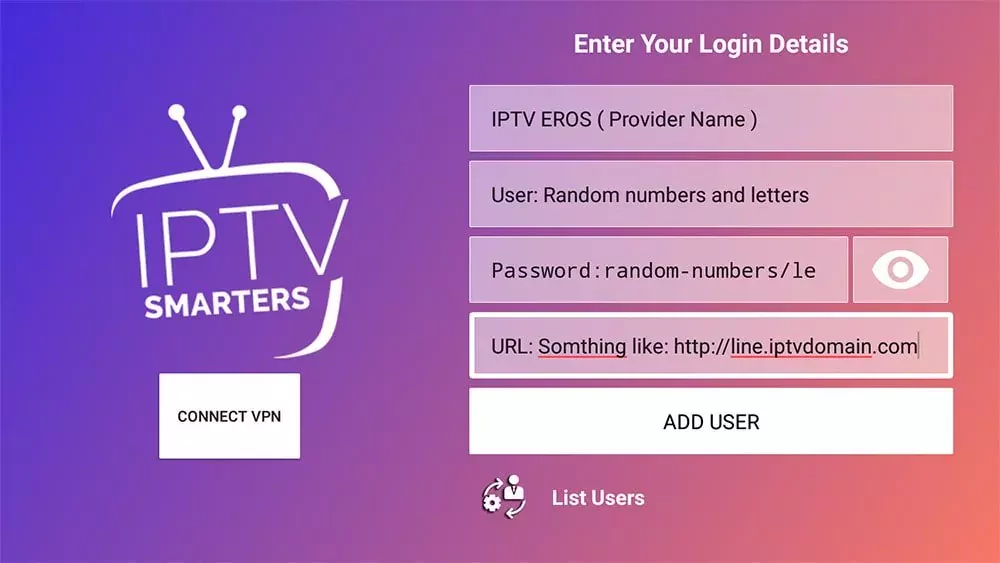
Now after you got your account information from your IPTV provider open IPTV smaters pro which will ask you to add a new user.
1- Click on Login with Xtream Codes API
as I said eirlier IPTV smarters pro gives you the choice to choose any method you like
- Load your playlist or File/URL is just another way to say m3u
- Load data from your device ( not recommended ) is an option that allows you to use an m3u file I don’t recommend it because each time your provider updates the channels list you will have to manually download the file and connect again.
- Login with Xtream Codes API ( Best way )
- play a single stream.

2- Enter your Account details
your provider will give you a username, a password, and a server URL put them all as shown on the image below, for the name you can put anything you like
Pro Tip: in case your Provider has sent you only the m3u, you can easily extract the Xtream codes from this URL as shown Below
the m3u URL is structured like this: http://line.domain.com/get.php?username=XXXXX&password=XXXXX&type=m3u_plus&output=ts
if you want to get the Xtream codes
- the server URL will be: http://line.domain.com/
- the user name is the numbers/letters after username=XXXXX
- the same for the password password=XXXXX
after you put your information click on add user.
if you wrote everything in the proper way IPTV Smarters will start downloading the channels list and organizing them into categories, the image below is what you need to see.
if it gives you an error make sure you first connect to the VPN in case your ISP is applying restrictions on your IPTV provider, if this didn’t fix the issue, reach out to your provider and send them a screenshot of what you see + what device you’re using, other information like from where you’re connecting will make the communication better, I will suggest you check this guide on how you can troubleshoot problems with IPTV.

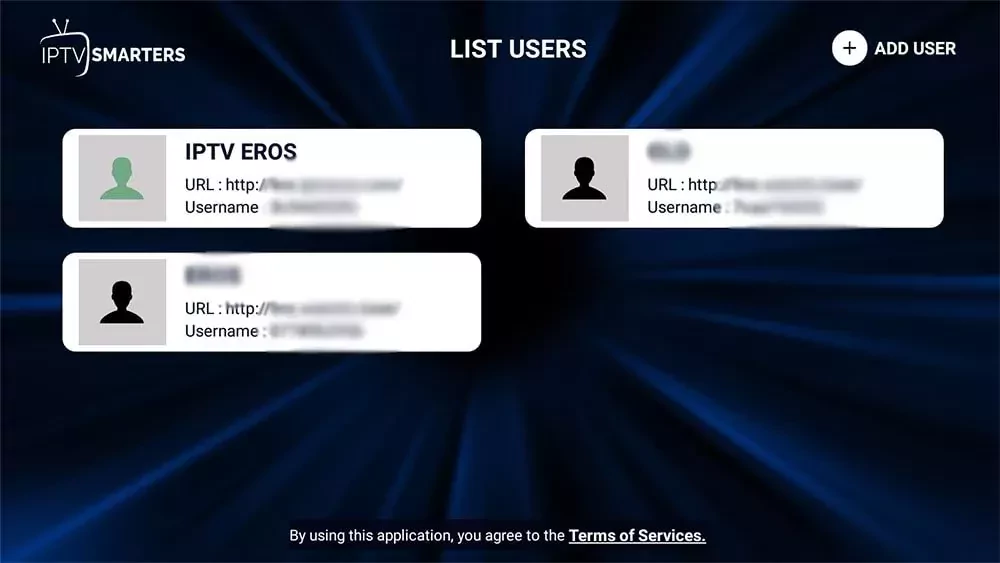
3- Click on the user you’ve just added
IPTV Smarters pro will allow you to add multiple providers with no limits, we always recommend subscribing to at least two different providers because IPTV is not stable and if your current provider went down for maintenance it is always a good thing to have a backup for it to stay online no matter what happens.
Now after you’ve successfully connected you will find the newly added user in user lists click on it to access the channels.
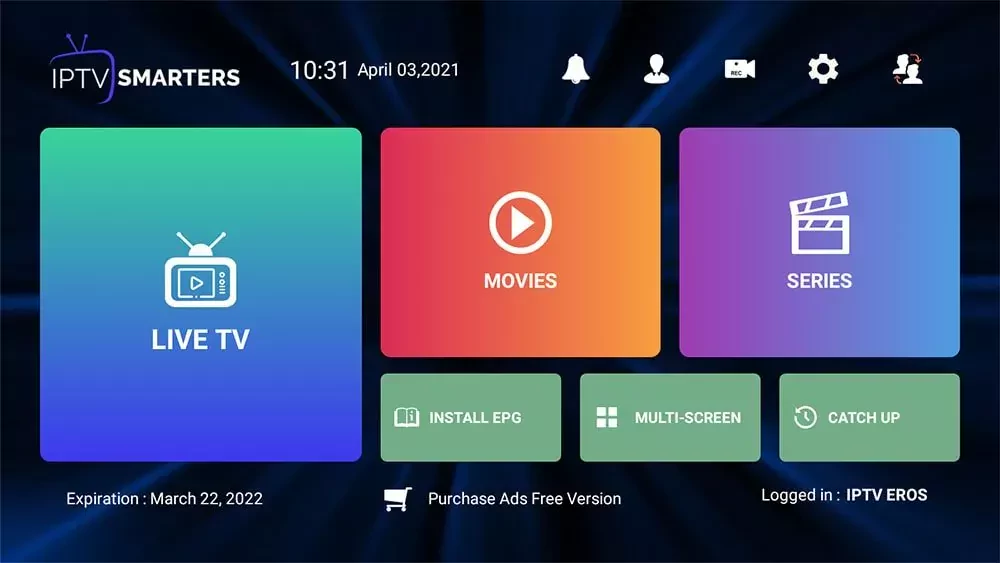
4- Click on live TV
This is how IPTV Smarters dashboard looks like, as you can tell it’s an intuitive user interface that lays down all the important sections in an organized and easy-to-use user interface.
Wrap up
By now you’ve successfully installed and connect IPTV Smarters Pro to your IPTV provider, if you like to check all the features that this app provides I will highly recommend you to check this guide.